Monday 23 May 2016

Google Authentication to ISAM/Webseal.

Google Authentication to ISAM/Webseal.

Recently, i was asked if i can implement Social Login to an existing ISAM Webseal.
I heard these words "Social Login" before but never cared to explore on what it was, So the requirement was in most of the websites there is an option called login with Facebook/Google/LinkedIn/Twiiter and similarly can something similar be used in ISAM as well, At first i was a little scared of it, but the concept was very interesting and on further exploring online it felt "Man This is Not so Hard!".

The basic idea was to use these social websites Login and retreive the user data which can be further veified in ISAM LDAP and create a session for the User in ISAM.
On Further exploring i decided on not to use any API calls of these social websites because using API calls would require their respective API Jars, this was something which i really dont want to Use and being an IAM guy i wanted to explore the functionality of OAUTH/OPENID/REST Procedure for this.
Hearing OAUTH/OPENID/REST words can mean nightmares but believe me its not so difficult, trust me once you get the hang of it you will feel its more easy than other standard methods.

So as Everybody knows Google is one of the best platforms to work with and it can basically give you any information but once i started this integration most the options provided by google were kind of misleading because one site says to do this way and the other says to do that way.

Basically i was stuck, so as always using Shane Weedens blog for facebook i tried to do the same with google but by tweeking the code and the functionality but using the same concept i got to finish it.

The Total Flow is like

Client Accesses the Webseal URL     ---->> Clicks on Login with Google option.
Clicks on Login with Google Option  ---->> Goes to google login page(where you enter your creds)
Goes to google login page(where you enter your creds)  ---->> sends a code back to your application.
Fetch the code and send the code with client id back to google in a "POST" method  ---->> Google will reply back with token
Fetch the token and send it back to google in "GET" Method  ---->> Google will give the user data in JSON Format

Going to the Steps on how to do : -----

1. Google ID:-
Make sure you have a test id for google(You got to be a blockhead if you dont have an google id).

2. Register you OAUTH Credential:
The title might seem strange but dont worry.
Basically Google provides you the facility to create something called as Credential or application where you provide your application url,
Its just to identify that the response is sent back to the correct url and there is no malicious activity happening in between.

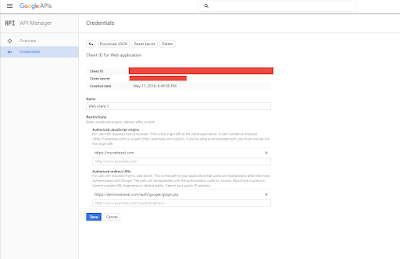
Login to the https://console.developers.google.com/apis/library and create a credential for your application.
So go ahead and create your application in it and make sure to note down the client id and client secret from it
In the Authorized Redirect uri make sure to give a proper url in my case it is given as https://<webseal ip/hostname>/auth/google/glogin.jsp
where auth/google is my junction in ISAM as well as my context root in the application and glogin.jsp is my application landing/home page.


3. JSP Call to Google OAUTH:
You can use the below code base for your application.
https://drive.google.com/file/d/0B-uIjGbTPyCXSjhBZW81UkROLTQ/view?usp=sharing
The zip file contains the Ecclipse Code which can be made to a war file and deployed on websphere application server.
The JSP code for making the call to google will look like below.

<%@ page language="java" contentType="text/html; charset=ISO-8859-1"
pageEncoding="ISO-8859-1"
import="com.tivoli.am.fim.demo.AccessTokenRetriever"
import="com.tivoli.am.fim.demo.ResourceRetriever"%>
<html>
<head>
<meta http-equiv="Content-Type" content="text/html; charset=ISO-8859-1">
<meta http-equiv="Pragma" content="no-cache">
<title>Facebook Login</title>
<%
String appid = "987654321.apps.googleusercontent.com";
String appsecret = "123456789";
String redirectURL = "https://demowebseal.com/auth/google/glogin.jsp";
String email = null;

String code = request.getParameter("code");
String token = request.getParameter("access_token");

if (code == null) {
// initiate authorization flow
String authorizeURLStr = "https://accounts.google.com/o/oauth2/auth?client_id=" + appid
+ "&approval_prompt=force&redirect_uri=" + redirectURL
+ "&response_type=code&scope=https%3A%2F%2Fwww.googleapis.com%2Fauth%2Fuserinfo.email+https%3A%2F%2Fwww.googleapis.com%2Fauth%2Fuserinfo.profile&state=profile";
response.sendRedirect(authorizeURLStr);
} else {

String accessTokenURLStr = "https://accounts.google.com/o/oauth2/token";

AccessTokenRetriever atr = new AccessTokenRetriever();
String accessToken = atr.getAccessToken(accessTokenURLStr, code);

String resourceURLStr = "https://www.googleapis.com/oauth2/v1/userinfo?access_token=" + accessToken;
ResourceRetriever rr = new ResourceRetriever(resourceURLStr);
email = rr.getEmail(resourceURLStr);

// use the email address as a response header and redirect to the epac CGI
response.setHeader("am-eai-user-id", email);
response.setHeader("am-eai-redir-url", "https://demowebseal.com/cgi-bin/epac");
}
%>
</head>
<body>
If you see this, you haven't set the trigger URL properly in WebSEAL's
config file.
<br /> User email address is:
<%=email%>
</body>
</html>

4. Installation and Configuration of Custom googleauth/EAI application:
Download the googleauth zip file from the below url
https://drive.google.com/file/d/0B-uIjGbTPyCXSjhBZW81UkROLTQ/view?usp=sharing
The zip file contains an ecclipse project, its a sample code which uses only email as the userid or iv-user value of the ISAM.
The jsp file contains the client secret and client id modify it with your google application value and deploy the application as a war file over Websphere or any application server.
In my case i have deployed it on websphere and gave the context root as "auth/google/". Created a Unauth transparent junction for this application in webseal and added the google certificates in websphere.
Make sure you have all the certificates including intermediate certificates of accounts.google.com host for 443 port.

In ISAM provide the below values to make googleauth application as a EAI trigger url.

eai-auth = https
eai-pac-header = am-eai-pac
eai-pac-svc-header = am-eai-pac-svc
eai-user-id-header = am-eai-user-id
eai-auth-level-header = am-eai-auth-level
eai-xattrs-header = am-eai-xattrs
eai-redir-url-header = am-eai-redir-url
retain-eai-session = no
trigger = /auth/google/glogin.jsp*

With this you are done with the setup.

For testing this solution make sure you provide a link to logging in with google option in your webseal login page and provide the url as below.
https://<websealname>/auth/google/glogin.jsp

The flow of this will look like below

This should take you to google login page for credentials.
Provide your creds and it will ask for permission to access you profile details basically your email, first name, last name etc.
Google auth code will get the request back as provided by the redirect uri in the request with a code.
Fetch the code and send it back in POST request to google for getting the token which will expire in 3600 seconds.
Google auth code will get the token and pass it back to google requesting for user details.
which will sent back in json format, decode the json and get the required value and set it as the iv-user header for webseal.


References Used:

https://developers.google.com/api-client-library/java/google-api-java-client/oauth2#android
https://github.com/google/google-oauth-java-client
https://www-304.ibm.com/connections/blogs/sweeden/entry/facebook_authentication_to_webseal?lang=en_us


Do let us know in the comments if you have any troubles in implementing this solution.
Peace Out......

Thursday 19 May 2016

Federated SSO to SalesForce Using ISAM 9

Salesforce is one of the well known applications in the Corporate world and also one of the best applications suited for federation, For all the people who want to learn Federation based SSO, the first example application that you can use to test federation based sso is Salesforce.
Salesforce has one of the best and easy way to configure SAML based SSO functionality.

As a test of ISAM 9 federation capability, i got the chance to integrate salesforce with ISAM 9 VA.
To be honest there were a few issues and being new to the federation capability on VA had to overcome some pretty long hurdles.

After some exploring it feels that IBM has done some pretty good stuff, though it might not have that much flexibilty as TFIM had but overall a good interface to begin with.
and frankly speaking 90% of people dont read the stuff completely, Dont know if anyone is reading this as well ...... :-)

So these are the things that you need to do for configuring SSO to salesforce:

1. Configure TFIM Runtime in ISAM
In the software version, we have to configure runtime manually which creates a application in Websphere. In the VA the runtime comes preconfigured and running as localhost which means its basically using management server ip address.
So first configure a new ip address from interfaces in VA to be specifically used for Runtime,
then go to Secure Federation>> Runtime Parameters,
and in the runtime listening interfaces select the rows with localhost and delete them and configure the same with the new IP which you have configured in interfaces, makes ure to configure with 80 and 443 ports.

2. Create a Mapping Rule using javascript in ISAM mapping rules
This step might seem a little confusing for all the people who were using XSL files for mapping, as the new VA has the support of javascript and not an xsl.
But not to worry as usual if you have the previous version of TFIM installed somewhere make sure to copy the examples folder in it, as it has a lot of information and examples which can help you a lot.
So for the current configuration we will be using your isam userid same as the salesforce userid/emailadress
Go to secure federation>> globalsettings >> mapping rules and add a new rule.
make sure to give the category as SAML2.0
The below image shows the java script that was used for this configuration.
mapping rule image ....


3. Create Federation with the newly created mappping rule.
Go to secure federation >> manage >> federations.
click on ADD button and provide a new name for federation and check the box beside saml 2.0

In Template tab make sure the SAML2.0 checkbox is checked.

Now give a proper name for the company name and also give the provider as https://<websealip>/isam/sps and select the option as identity provider.

Give the point of contact as https://<websealip>/isam

In profile selection, select Web Browser Single sign on.

Single Sign on Settings select the options as shown in the below figure.

In Signature options select as below.

Make sure to select the same certificates as the previous screen.

Keep the settings as shown below.

For Identity Mapping, select the option of javascript transformation for identity mapping.

Select the Identity Mapping which was created previously.

Recheck all your previous selected options in the Summary.

4. verify the TFIM Runtime and get the federation ID.
Now that the Federation is configured we need to confirm the details of the Federation.
Go to Secure Federation >> Global Settings >> user registry.
make sure a user other than admin is created in this example easuser is created.
Now Access the URL in the Browser.
https://<Webseal IP>/Info/InfoServiceXML
For credentials provide easuser and password as passw0rd
This should show you the details of your federation, make sure to note down all the details like federation name, federation ID as well.

5. Configuring Federation(TFIM) with ISAM:
There are multple ways to do this,
We can do the configurations manually(you will learn a lot in this but basically one wrong move can lead to a lot of headache)
Personally i believe the best option to use is  to call the webservice(REST), most people get very afraid of the name webservice but trust me its one of the easiest and most interesting options.
If you have TDI you can use that or curl command or if you have SOAP UI you can use that as well.
The easy option is SOAP UI, which we will be using in this configuration.
So create a REST Project in SOAP UI and provide the details as given in the screenshot.


6. Export the certificate which was used while creating federation for encryption.
In this example we have used the certificate database called rt_profile_keys with a label called server.
Now export this certificate and import it to signer certificates of webseal certificate database in my case it is pdsrv

7. Configure SSO settings in Salesforce and export the metadata.
Login to the sales force application and navigate to Administration Setup -> Security Controls -> Single Sign-On Settings:
and create the SAML 2.0 setup with the below details


8. Use the metadata to create the partner in ISAM.
Now download the metadata from salesforce after configuring sso settings in it.
Now login to ISAM and browse to Secure Federation>> Manage>> Federations.
Then select the federation and click on partners and add a partner.
Now upload the metadata file to ISAM
In the General information tab provide the name as https://saml.salesforce.com as select the check box enabled and click on next.

Give the provider ID as https://saml.salesforce.com and make sure the partner role is selected as service provider and click on next.

select web browser single sign on and click on next.

Keep the settings as default and select next.

In ssl certificates make sure you are using the same certificate as the one that you used in federation and click on Next.

Make sure to have the settings as shown in the below image.

In encryption options select the certificates and click on Next.

In Identity Mapping select the option use Identity Mapping that is configured for this federation.

In summary verify all the options again and click on OK.

This will create your partner and then you are done..

Now access the below url for SSO to salesforce.
https://<your webseal ip/hostname>/isam/sps/salesforce/saml20/logininitial?RequestBinding=HTTPPost&PartnerId=https://saml.salesforce.com&NameIdFormat=email


Thursday 7 April 2016

Assigning Read, Write Permissions to user in IBM TDS

We can assign the permissions to a user using IDSWebApp Console.
Below are the steps to give permissions for a user to login to ldap and perform activities:

1. Go to Directory management => Manage entries.  Select the suffix dc=com and click on Edit ACL.

2. On the left, click on the Non-filtered ACLs. Select the Propagate ACLs check box to allow descendants without an explicitly defined ACL to inherit from this entry. Enter the distinguished name of the lookup user ( like uid=testuser,ou=users,ou=mycom,dc=com)

3. For Type, select access-id, because this DN is a user, then select ADD


4. Assign required Permissions like grant to the Read, Write, Search, and Compare security classes.  Click OK, then OK again on the following screen to save your changes. 

Now you are good to connect to LDAP using the 

Thursday 31 March 2016

Configuring ISIM as a Log Source For Qradar

Simple steps on Configuring ISIM as a Log Source for Qradar:

 For configuring ISIM as a Log Source we have to create two log sources:
1. For Connecting to ISIM DB (All Transactions performed on ISIM)
2. For Getting the ISIM DB Audit Logs(Transactions Performed on the ISIM DB).


ISIM Based Event Configuration:

Network Related configurations:

1. Make sure the DB2 port is open to the Qradar Machine


Configurations on Qradar:

1. Create a Log source for ISIM in Qradar.
2. Provide the below values for the Log source.
Log source Name: (Provide a Name for the Log source)
Log Source Description: (Provide a Description of the Log source)
Log souce Type: Select the option IBM Security Identity Manager.
Protocol Type: IBM Security identity manager JDBC
Log Source Identifier: (Name of DB)@(ip/Hostname of the DB machine)
DataBase Type : DB2
Database Name : (Name of the ISIM DB)
IP or Hostname: (IP/Hostname of the Database)
Port : (Port of DB2)
User name : (Provide the user name for connecting to Qradar)
Password : (Provide the password for the Username used to connect to DB)
Confirm Password : (Provide the password for the Username used to connect to DB)
Table Name : ISIMDB.AUDIT_EVENT
Select List : *
Compare Field : TIMESTAMP
Start Date: (Provide a Start date for the Qradar to read the events from DB, format is yyyy-mm-dd hh:mm)
Polling Interval : 30
EPS Throttle : 1000
Enabled : Check the box
Credibility : 5
Target Event Collector : (Select the first option in the dropdown, Mostly only one option is available)
Coaliscing Events : Check th box
Store Event Payload : Check the box
Log Source Extension : Leave as it is
Extension Use Condition : Leave as it is

3. Save the Log source.

Configuring ISIM Audit Events in Qradar:

Network Based Configurations:
1. Make sure port 22 for ftp/SFTP is open for Qradar to fetch the audit log file.

ISIM DB Based Configurations:

1. Login to DB2 server and switch user to DB instance owner
2. Run below command to configure a path for audit logs
  db2audit configure datapath /data/itimdb/sqllib/security/auditdata/
3. Connect to DB
   db2 connect to isimdb
4. Create audit policy on the database with category ‘execute’ to pick SQL statements executed
   db2 create audit policy db_policy categories execute with data status both error type audit
db2 audit database using policy db_policy
 db2 commit
5. Restart db2audit utility
  db2audit stop
 db2audit start
6. Execute below command to flush out audit log
 db2audit flush
7. Extract the audit logs
db2audit archive database itimdb
8. Extract the logs to a readable format
 db2audit extract from files <filename generated in step 7>
9. Create a Cronjob for the steps from 6 to 8 to be executed every one hour for the audit log to be generated.

Qradar side configurations:

1. Log in to QRadar.
2. Click the Admin tab.
3. Click the Log Sources icon.
4. Click Add.
5. In the Log Source Name field, type a name for the log source.
6. In the Log Source Description field, type a description for the log source.
7. From the Log Source Type list, select IBM DB2.
8. From the Protocol Configuration list, select Log File.
9. Provide the values as below:
Log Source Identifier : (IP/ Hostname of the DB2 Machine)
Service Type : FTP/SCP
Remote IP or Hostname : (IP/Hostname of DB2 machine)
Remote Port : 22
Remote User : Username of the user to connect to the db2 machine
Remote Password : Password of the user for connecting to db2 machine
Confirm Password : Password of the user for connecting to db2 machine
SSH Key file : (Only if you are using sftp if not leave it blank)
Remote Directory : Path of the directory in db2 machine where the log file is present
Recursive : (Only if you are using sftp if not leave it blank)
FTP File Pattern : .*.log
FTP Transfer Mode : ASCII
Start time : 12:10
Recurrence : 1H
Run On Save : check the box
EPS Throttle : 100
Processor : From the list, select None.
Ignore Previously Processed File(s): Select this check box
Change Local Directory: Do not select the check box
Event Generator : From the Event Generator list, select LineByLine.

10. Click Save.

Wednesday 16 March 2016

TFIM Client certificate renewal

    To avoid criticalities during this activity, it’s advisable to take backups of the keystore.

Take the backup of both key.p12 and trust.p12 from the location as mentioned below :
/opt/IBM/WebSphere/AppServer/profiles/Dmgr01/config/cells/*******Cell01
/opt/IBM/WebSphere/AppServer/profiles/Dmgr01/config/cells/*******Cell01/nodes/*******Node01
Get the required certificate(signaturevalidation and encryption certs) for renewal in .PEM format (Only this format).  Certificate can be copied from Metadata file provided by partner. Copy the certificate in the notepad and add Begin and end certificate tags in Beginning and End and save the file in .cer format.
Import both the certs in DefaultTrustedKeyStore in TFIM (testonly is the password for DefaultTrustedKeyStore).
Load the Configuration in TFIM.
Choose the required partner and click on properties.
Under Signature Validation key, choose keystore >DefaultTrustedKeyStore, provide password and select the signature_validation.crt.
Under Encryption Key Identifier, choose keystore >DefaultTrustedKeyStore, provide password and select the encryption.crt.
No changes required under Server Validation Certificate
Load the Configuration.
Validate the changes
Check the partner status(should be enabled) before testing the federation.
Restart WAS if federation fails to work.(Not Mandatory)
 
  Thanks,
  Nandavaram Pavan Kumar


Deleting TAM/ISAM Users from registry

Sometimes runtime configuration(policy Server in Appliance) fails (or partially configured) in TAM/ISAM due to some issues.

When the users tries to reconfigure it again, ISAM throws an error message its already configured but it will not be in running state.

So its better to delete the default user entries created by TAM/ISAM before reconfiguring it.

Below are the commands to delete the default ISAM users(created during the runtime configuration) from the registry before reconfiguring it.

cd /opt/ibm/ldap/V6.3/bin
./idsldapdelete -D cn=root -w <password> cn=Subdomains,secAuthority=Default
./idsldapdelete -D cn=root -w <password> cn=Resources,secAuthority=Default
./idsldapdelete -D cn=root -w <password> cn=ResourceGroups,secAuthority=Default
./idsldapdelete -D cn=root -w <password> cn=Default,cn=Policies,secAuthority=Default
./idsldapdelete -D cn=root -w <password> cn=SecurityGroup,secAuthority=Default
./idsldapdelete -D cn=root -w <password> cn=SecurityGroup,cn=Groups,secAuthority=Default
./idsldapdelete -D cn=root -w <password> cn=ivacld-servers,cn=SecurityGroups,secAuthority=Default
./idsldapdelete -D cn=root -w <password> cn=ivacld-servers,cn=Groups,secAuthority=Default
./idsldapdelete -D cn=root -w <password> cn=remote-acl-users,cn=SecurityGroups,secAuthority=Default
./idsldapdelete -D cn=root -w <password> cn=remote-acl-users,cn=Groups,secAuthority=Default
./idsldapdelete -D cn=root -w <password> cn=SecurityMaster,secAuthority=Default
./idsldapdelete -D cn=root -w <password> cn=Policy,cn=Policies,principalName=sec_master,cn=Users,secAuthority=Default
./idsldapdelete -D cn=root -w <password> cn=Policy,cn=Policies,principalName=ivmgrd/master,cn=Users,secAuthority=Default
./idsldapdelete -D cn=root -w <password> cn=Policies,principalName=sec_master,cn=Users,secAuthority=Default
./idsldapdelete -D cn=root -w <password> cn=Policies,principalName=ivmgrd/master,cn=Users,secAuthority=Default
./idsldapdelete -D cn=root -w <password> cn=ivmgrd-servers,cn=SecurityGroups,secAuthority=Default
./idsldapdelete -D cn=root -w <password> cn=ivmgrd-servers,cn=Groups,secAuthority=Default
./idsldapdelete -D cn=root -w <password> cn=iv-admin,cn=SecurityGroups,secAuthority=Default
./idsldapdelete -D cn=root -w <password> cn=iv-admin,cn=Groups,secAuthority=Default
./idsldapdelete -D cn=root -w <password> cn=secmgrd-servers,cn=SecurityGroups,secAuthority=Default
./idsldapdelete -D cn=root -w <password> cn=secmgrd-servers,cn=Groups,secAuthority=Default
./idsldapdelete -D cn=root -w <password> cn=webseal-servers,cn=SecurityGroups,secAuthority=Default
./idsldapdelete -D cn=root -w <password> cn=webseal-servers,cn=Groups,secAuthority=Default
./idsldapdelete -D cn=root -w <password> cn=webseal-mpa-servers,cn=SecurityGroups,secAuthority=Default
./idsldapdelete -D cn=root -w <password> cn=webseal-mpa-servers,cn=Groups,secAuthority=Default
./idsldapdelete -D cn=root -w <password> cn=ivmgrd/master,cn=SecurityDaemons,secAuthority=Default
./idsldapdelete -D cn=root -w <password> principalName=ivmgrd/master,cn=Users,secAuthority=Default
./idsldapdelete -D cn=root -w <password> principalName=sec_master,cn=Users,secAuthority=Default
./idsldapdelete -D cn=root -w <password> cn=Users,secAuthority=Default
./idsldapdelete -D cn=root -w <password> cn=Groups,secAuthority=Default
./idsldapdelete -D cn=root -w <password> cn=SecurityGroups,secAuthority=Default
./idsldapdelete -D cn=root -w <password> cn=Policies,secAuthority=Default
./idsldapdelete -D cn=root -w <password> cn=SecurityDaemons,secAuthority=Default
./idsldapdelete -D cn=root -w <password> secAuthority=Default


./idsldapsearch -D cn=root -w <password> -b 'secAuthority=Default' -s sub '(objectclass=*)'


Thanks,
Nandavaram Pavan Kumar

Simple Steps to customize TFIM (Software version) error pages

It is essential to customize the TFIM error pages after configuring Federation to display custom error pages to end user

Below are the simple steps to customize it.

Customize required TFIM error pages as per the requirement (Deafult location of the Webpages: /opt/IBM/FIM/pages/C/saml20) and publish the pages from WAS console to take into effect.


Steps to publish

Log into the WAS Application Server Console
Select the Tivoli Federated Identity Manager section
Select the Domain Management
Click the Publish pages button
Click the “Load Configuration Domains “ button.

Now you should see the customized error page

Thanks,
Nandavaram Pavan Kumar

Tuesday 15 March 2016

Qradar Integration with IBM SAM for E-Bussiness(VA)

Lately, I been working on the IBM products like ISIG and Qradar and trying to get them integrated with the existing IBM Products like ISIM and ISAM.
ISIG/IGI seems to be a good tool to look upto in future with a strong Workflow system and application integration of ISIM with the Identity/Access Governance features of ISIG it has the capability to become a strong contender for other governance products....
Ok,... Now Leaving all those aside lets look into the Qradar tool..
Qradar is a powerfull tool known across in the IAM World as one of the Strong Monitoring Tools provided by IBM.
So with the IBM trying to promote Virtual Appliance in its IAM World. I thought of trying to integrate Qradar with ISAM for monitoring and naturally with my lack on knowledge on monitoring tools, i came across a few issues while configuring and did not find much help in internet as well...
Except for a great reference from Shane Wheeden(He is like the Hercules in IAM World for IBM Technologies, I mean this guy is everywhere and seems to have done EVERYTHING, "Cheers Mate and may you live longggggggggggg")...

ok So moving on.....

In this integration ISAM VA is configured to send the logs to the Qradar machine on IP 514 and Qradar picks up this logs and provides the event based on the logs.

So if the logs sre sent to Qradar then will the VA do not contain any logs?....
No, The logs will be created in ISAM VA also, The VA will create a seperate instance on logs on the VA apart from the logs being sent to the Qradar and deleting or modifying of these logs do not affect the Qradar instance of log files...

Qradar will read the logs and create the events according to the configuration or the log source extension and based on that it will decode on how to display it in the log events....

Blah blah blah.... and so on and on... Ahhhhhhhh.... Too much explanation.....

Steps to configure ISAM(VA) as a log source with Qradar:

Network Based Configurations:
1. Make sure you have 514 port open from ISAM(VA) to the Qradar(Trust me everyone forgets this).

Qradar Side Configurations:
1. Create a Log Source Extension with the below values.
Name: (Provide a name of your choice)
Description: (Anything that explains why you have this extension created)
Use Condition: Parsing Enhancement
Log Source Type: IBM Tivoli access manager for e-bussiness

2. Now in the Extension Document make sure you type everything that is given below without missing a word or a line.

<?xml version="1.0" encoding="UTF-8"?>
<device-extension xmlns="event_parsing/device_extension">

<pattern id="allEventNames" xmlns=""><![CDATA[(.*)]]></pattern>

<pattern id="RequestLogEventPattern" xmlns=""><![CDATA[<114>1 (.*)]]></pattern>

<pattern id="TimeJan" xmlns=""><![CDATA[TS:([0-9][0-9][0-9][0-9])-01-([0-9][0-9])T([0-9][0-9]):([0-9][0-9]):([0-9][0-9])]]></pattern>
<pattern id="TimeFeb" xmlns=""><![CDATA[TS:([0-9][0-9][0-9][0-9])-02-([0-9][0-9])T([0-9][0-9]):([0-9][0-9]):([0-9][0-9])]]></pattern>
<pattern id="TimeMar" xmlns=""><![CDATA[TS:([0-9][0-9][0-9][0-9])-03-([0-9][0-9])T([0-9][0-9]):([0-9][0-9]):([0-9][0-9])]]></pattern>
<pattern id="TimeApr" xmlns=""><![CDATA[TS:([0-9][0-9][0-9][0-9])-04-([0-9][0-9])T([0-9][0-9]):([0-9][0-9]):([0-9][0-9])]]></pattern>
<pattern id="TimeMay" xmlns=""><![CDATA[TS:([0-9][0-9][0-9][0-9])-05-([0-9][0-9])T([0-9][0-9]):([0-9][0-9]):([0-9][0-9])]]></pattern>
<pattern id="TimeJun" xmlns=""><![CDATA[TS:([0-9][0-9][0-9][0-9])-06-([0-9][0-9])T([0-9][0-9]):([0-9][0-9]):([0-9][0-9])]]></pattern>
<pattern id="TimeJul" xmlns=""><![CDATA[TS:([0-9][0-9][0-9][0-9])-07-([0-9][0-9])T([0-9][0-9]):([0-9][0-9]):([0-9][0-9])]]></pattern>
<pattern id="TimeAug" xmlns=""><![CDATA[TS:([0-9][0-9][0-9][0-9])-08-([0-9][0-9])T([0-9][0-9]):([0-9][0-9]):([0-9][0-9])]]></pattern>
<pattern id="TimeSep" xmlns=""><![CDATA[TS:([0-9][0-9][0-9][0-9])-09-([0-9][0-9])T([0-9][0-9]):([0-9][0-9]):([0-9][0-9])]]></pattern>
<pattern id="TimeOct" xmlns=""><![CDATA[TS:([0-9][0-9][0-9][0-9])-10-([0-9][0-9])T([0-9][0-9]):([0-9][0-9]):([0-9][0-9])]]></pattern>
<pattern id="TimeNov" xmlns=""><![CDATA[TS:([0-9][0-9][0-9][0-9])-11-([0-9][0-9])T([0-9][0-9]):([0-9][0-9]):([0-9][0-9])]]></pattern>
<pattern id="TimeDec" xmlns=""><![CDATA[TS:([0-9][0-9][0-9][0-9])-12-([0-9][0-9])T([0-9][0-9]):([0-9][0-9]):([0-9][0-9])]]></pattern>

<pattern id="UsernamePattern" xmlns=""><![CDATA[ U:(.*) AL:]]></pattern>

<match-group order="1" description="IDaaS Request Log Events" xmlns="">

<matcher field="DeviceTime" order="1" pattern-id="TimeJan" capture-group="Jan \2 \3:\4:\5" enable-substitutions="true"/>
<matcher field="DeviceTime" order="2" pattern-id="TimeFeb" capture-group="Feb \2 \3:\4:\5" enable-substitutions="true"/>
<matcher field="DeviceTime" order="3" pattern-id="TimeMar" capture-group="Mar \2 \3:\4:\5" enable-substitutions="true"/>
<matcher field="DeviceTime" order="4" pattern-id="TimeApr" capture-group="Apr \2 \3:\4:\5" enable-substitutions="true"/>
<matcher field="DeviceTime" order="5" pattern-id="TimeMay" capture-group="May \2 \3:\4:\5" enable-substitutions="true"/>
<matcher field="DeviceTime" order="6" pattern-id="TimeJun" capture-group="Jun \2 \3:\4:\5" enable-substitutions="true"/>
<matcher field="DeviceTime" order="7" pattern-id="TimeJul" capture-group="Jul \2 \3:\4:\5" enable-substitutions="true"/>
<matcher field="DeviceTime" order="8" pattern-id="TimeAug" capture-group="Aug \2 \3:\4:\5" enable-substitutions="true"/>
<matcher field="DeviceTime" order="9" pattern-id="TimeSep" capture-group="Sep \2 \3:\4:\5" enable-substitutions="true"/>
<matcher field="DeviceTime" order="10" pattern-id="TimeOct" capture-group="Oct \2 \3:\4:\5" enable-substitutions="true"/>
<matcher field="DeviceTime" order="11" pattern-id="TimeNov" capture-group="Nov \2 \3:\4:\5" enable-substitutions="true"/>
<matcher field="DeviceTime" order="12" pattern-id="TimeDec" capture-group="Dec \2 \3:\4:\5" enable-substitutions="true"/>

<matcher field="EventName" order="1" pattern-id="RequestLogEventPattern" capture-group="Miscellaneous Webseal-Instance Event" enable-substitutions="true" />
<matcher field="UserName" order="1" pattern-id="UsernamePattern" capture-group="1"/>

<event-match-single event-name="Miscellaneous Webseal-Instance Event" device-event-category="Information" send-identity="OverrideAndNeverSend" />

</match-group>

</device-extension>

3. save or submit and then go to the log Souces now..
4. Create a log source with the below values.
Name: (Anything you prefer)
Description: (Anything that explains why you have this extension created)
Log Source Type: Choose IBM tivoli access manager for e-bussiness.
Protocol Configuration: Syslog
Log Source Identifier: ip address of the VA/ Hostname of the VA machine
Enabled: check the box
Credibility: 5
Target Event Collector: eventcollector0 :: qradarisamlog -- (This might change,.. basically you will get only one option so select that)
Do not check the Collascing Event Check box
Incoming Payload Encoding: UTF-8
Store event Paylod : check the box.
Log source Extension: (Provide the name of you extension that you have created previously)
Entension Use Condition: Parsing Enhancement

5. Now save and submit.

ISAM Side Configurations:
To get the events for the Webseal related scenerio's:

1. Edit the configuration file of the Webseal.
In the [aznapi-Configuration] Stanza modify the logcfg parameter as below.

logcfg = audit.azn:rsyslog server="ip/hostname of qradar",port=514,log_id=webseal-websealname
logcfg = audit.authn:rsyslog server="ip/hostname of qradar",port=514,log_id=webseal-websealname
logcfg = http:rsyslog server="ip/hostname of qradar",port=514,log_id=webseal-websealname

To get the Events for the Administration related events for scenerios concering policy server:

1. Edit the ivmgrd configuration file in the Runtime Configuration.
In the [aznapi-Configuration] Stanza modify the logcfg paramter as below.

logcfg = audit.mgmt:rsyslog server="ip/hostname of qradar",port=514,log_id=PDMgrAudit
logcfg = audit.azn:rsyslog server="ip/hostname of qradar",port=514,log_id=PDMgrAudit
logcfg = audit.authn:rsyslog server="ip/hostname of qradar",port=514,log_id=PDMgrAudit


Now you might be wondering if you have multiple webseal what happens then?...
The Qradar gives the events based on the webseal name that you configured so if the log_id is different then the name of the event will have that id as well which will help you in identifying if they are coming from a dfferent webseal.

As there is only policy server so it will give you all the events related to the administration tasks done for other webseals also.. Basically alll the senerios being undertaken in policy server will be recorded in Qradar as an event(Like ACL, POP and User creation)... Even the login to the WPM also..

Note: Do not miss any steps as all the steps mentioned above are mandatory...  :-)

Tuesday 5 January 2016

Disabling Non-SSL/HTTP port in IBM Websphere

Every Client who is using an IAM tool would always want to go for SSL except for a few rare cases and it is generally Preferred to go for HTTPS as it is more secure.

Most of the IAM SME's generally struggle and fear when they hear the word HTTPS and certificates.
We provide all the Identity and Access management products on HTTPS protocol to clients but tend to forget that the Non-SSL or HTTP port might still be open which can lead to breach in security when the client comes across this loophole..

In IBM the most prominent tool for deploying any custom application or an IAM application is IBM Websphere and the best way to block the http port or non-ssl port of websphere is as below.

1. Log on to the WebSphere Application Server administrative console.
2. Click Environment > Virtual Hosts.
3. Click default_host.
4. Click Host Aliases in the Additional Properties section.
5. Select the row of default HTTP port (9080) on which Security Identity Manager is deployed.
6. Click Delete to remove the port from the virtual host.
7. Click Save to apply the changes to the master configuration.
8. Update the global web server plug-in configuration.
a. Click Environment > Update global Web server plug-in configuration.
b. Click OK to update the plug-in configuration file.
9. Restart the WebSphere Application Server.

This will remove the entry of the port in Websphere and there by allowing access only via the HTTPS Port.
We can add this entry back as a default_host in websphere and all the applications that were deployed on the http port will start working again.
We are only removing the refrence to this port in Websphere and not the port configuration.

There are different ways of doing this but i generally use the above one as i find it more easier.....