Google Authentication to ISAM/Webseal.
Recently, i was asked if i can implement Social Login to an existing ISAM Webseal.
I heard these words "Social Login" before but never cared to explore on what it was, So the requirement was in most of the websites there is an option called login with Facebook/Google/LinkedIn/Twiiter and similarly can something similar be used in ISAM as well, At first i was a little scared of it, but the concept was very interesting and on further exploring online it felt "Man This is Not so Hard!".
The basic idea was to use these social websites Login and retreive the user data which can be further veified in ISAM LDAP and create a session for the User in ISAM.
On Further exploring i decided on not to use any API calls of these social websites because using API calls would require their respective API Jars, this was something which i really dont want to Use and being an IAM guy i wanted to explore the functionality of OAUTH/OPENID/REST Procedure for this.
Hearing OAUTH/OPENID/REST words can mean nightmares but believe me its not so difficult, trust me once you get the hang of it you will feel its more easy than other standard methods.
So as Everybody knows Google is one of the best platforms to work with and it can basically give you any information but once i started this integration most the options provided by google were kind of misleading because one site says to do this way and the other says to do that way.
Basically i was stuck, so as always using Shane Weedens blog for facebook i tried to do the same with google but by tweeking the code and the functionality but using the same concept i got to finish it.
The Total Flow is like
Client Accesses the Webseal URL ---->> Clicks on Login with Google option.
Clicks on Login with Google Option ---->> Goes to google login page(where you enter your creds)
Goes to google login page(where you enter your creds) ---->> sends a code back to your application.
Fetch the code and send the code with client id back to google in a "POST" method ---->> Google will reply back with token
Fetch the token and send it back to google in "GET" Method ---->> Google will give the user data in JSON Format
Going to the Steps on how to do : -----
1. Google ID:-
Make sure you have a test id for google(You got to be a blockhead if you dont have an google id).
2. Register you OAUTH Credential:
The title might seem strange but dont worry.
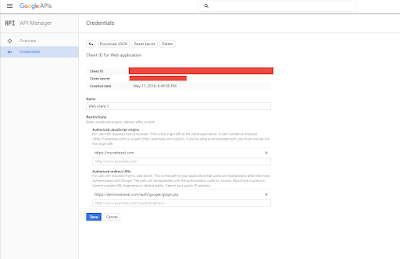
Basically Google provides you the facility to create something called as Credential or application where you provide your application url,
Its just to identify that the response is sent back to the correct url and there is no malicious activity happening in between.
Login to the https://console.developers.google.com/apis/library and create a credential for your application.
So go ahead and create your application in it and make sure to note down the client id and client secret from it
In the Authorized Redirect uri make sure to give a proper url in my case it is given as https://<webseal ip/hostname>/auth/google/glogin.jsp
where auth/google is my junction in ISAM as well as my context root in the application and glogin.jsp is my application landing/home page.
3. JSP Call to Google OAUTH:
You can use the below code base for your application.
https://drive.google.com/file/d/0B-uIjGbTPyCXSjhBZW81UkROLTQ/view?usp=sharing
The zip file contains the Ecclipse Code which can be made to a war file and deployed on websphere application server.
The JSP code for making the call to google will look like below.
<%@ page language="java" contentType="text/html; charset=ISO-8859-1"
pageEncoding="ISO-8859-1"
import="com.tivoli.am.fim.demo.AccessTokenRetriever"
import="com.tivoli.am.fim.demo.ResourceRetriever"%>
<html>
<head>
<meta http-equiv="Content-Type" content="text/html; charset=ISO-8859-1">
<meta http-equiv="Pragma" content="no-cache">
<title>Facebook Login</title>
<%
String appid = "987654321.apps.googleusercontent.com";
String appsecret = "123456789";
String redirectURL = "https://demowebseal.com/auth/google/glogin.jsp";
String email = null;
String code = request.getParameter("code");
String token = request.getParameter("access_token");
if (code == null) {
// initiate authorization flow
String authorizeURLStr = "https://accounts.google.com/o/oauth2/auth?client_id=" + appid
+ "&approval_prompt=force&redirect_uri=" + redirectURL
+ "&response_type=code&scope=https%3A%2F%2Fwww.googleapis.com%2Fauth%2Fuserinfo.email+https%3A%2F%2Fwww.googleapis.com%2Fauth%2Fuserinfo.profile&state=profile";
response.sendRedirect(authorizeURLStr);
} else {
String accessTokenURLStr = "https://accounts.google.com/o/oauth2/token";
AccessTokenRetriever atr = new AccessTokenRetriever();
String accessToken = atr.getAccessToken(accessTokenURLStr, code);
String resourceURLStr = "https://www.googleapis.com/oauth2/v1/userinfo?access_token=" + accessToken;
ResourceRetriever rr = new ResourceRetriever(resourceURLStr);
email = rr.getEmail(resourceURLStr);
// use the email address as a response header and redirect to the epac CGI
response.setHeader("am-eai-user-id", email);
response.setHeader("am-eai-redir-url", "https://demowebseal.com/cgi-bin/epac");
}
%>
</head>
<body>
If you see this, you haven't set the trigger URL properly in WebSEAL's
config file.
<br /> User email address is:
<%=email%>
</body>
</html>
4. Installation and Configuration of Custom googleauth/EAI application:
Download the googleauth zip file from the below url
https://drive.google.com/file/d/0B-uIjGbTPyCXSjhBZW81UkROLTQ/view?usp=sharing
The zip file contains an ecclipse project, its a sample code which uses only email as the userid or iv-user value of the ISAM.
The jsp file contains the client secret and client id modify it with your google application value and deploy the application as a war file over Websphere or any application server.
In my case i have deployed it on websphere and gave the context root as "auth/google/". Created a Unauth transparent junction for this application in webseal and added the google certificates in websphere.
Make sure you have all the certificates including intermediate certificates of accounts.google.com host for 443 port.
In ISAM provide the below values to make googleauth application as a EAI trigger url.
eai-auth = https
eai-pac-header = am-eai-pac
eai-pac-svc-header = am-eai-pac-svc
eai-user-id-header = am-eai-user-id
eai-auth-level-header = am-eai-auth-level
eai-xattrs-header = am-eai-xattrs
eai-redir-url-header = am-eai-redir-url
retain-eai-session = no
trigger = /auth/google/glogin.jsp*
With this you are done with the setup.
For testing this solution make sure you provide a link to logging in with google option in your webseal login page and provide the url as below.
https://<websealname>/auth/google/glogin.jsp
The flow of this will look like below
This should take you to google login page for credentials.
Provide your creds and it will ask for permission to access you profile details basically your email, first name, last name etc.
Google auth code will get the request back as provided by the redirect uri in the request with a code.
Fetch the code and send it back in POST request to google for getting the token which will expire in 3600 seconds.
Google auth code will get the token and pass it back to google requesting for user details.
which will sent back in json format, decode the json and get the required value and set it as the iv-user header for webseal.
References Used:
https://developers.google.com/api-client-library/java/google-api-java-client/oauth2#android
https://github.com/google/google-oauth-java-client
https://www-304.ibm.com/connections/blogs/sweeden/entry/facebook_authentication_to_webseal?lang=en_us
Do let us know in the comments if you have any troubles in implementing this solution.
Peace Out......
Recently, i was asked if i can implement Social Login to an existing ISAM Webseal.
I heard these words "Social Login" before but never cared to explore on what it was, So the requirement was in most of the websites there is an option called login with Facebook/Google/LinkedIn/Twiiter and similarly can something similar be used in ISAM as well, At first i was a little scared of it, but the concept was very interesting and on further exploring online it felt "Man This is Not so Hard!".
The basic idea was to use these social websites Login and retreive the user data which can be further veified in ISAM LDAP and create a session for the User in ISAM.
On Further exploring i decided on not to use any API calls of these social websites because using API calls would require their respective API Jars, this was something which i really dont want to Use and being an IAM guy i wanted to explore the functionality of OAUTH/OPENID/REST Procedure for this.
Hearing OAUTH/OPENID/REST words can mean nightmares but believe me its not so difficult, trust me once you get the hang of it you will feel its more easy than other standard methods.
So as Everybody knows Google is one of the best platforms to work with and it can basically give you any information but once i started this integration most the options provided by google were kind of misleading because one site says to do this way and the other says to do that way.
Basically i was stuck, so as always using Shane Weedens blog for facebook i tried to do the same with google but by tweeking the code and the functionality but using the same concept i got to finish it.
The Total Flow is like
Client Accesses the Webseal URL ---->> Clicks on Login with Google option.
Clicks on Login with Google Option ---->> Goes to google login page(where you enter your creds)
Goes to google login page(where you enter your creds) ---->> sends a code back to your application.
Fetch the code and send the code with client id back to google in a "POST" method ---->> Google will reply back with token
Fetch the token and send it back to google in "GET" Method ---->> Google will give the user data in JSON Format
Going to the Steps on how to do : -----
1. Google ID:-
Make sure you have a test id for google(You got to be a blockhead if you dont have an google id).
2. Register you OAUTH Credential:
The title might seem strange but dont worry.
Basically Google provides you the facility to create something called as Credential or application where you provide your application url,
Its just to identify that the response is sent back to the correct url and there is no malicious activity happening in between.
Login to the https://console.developers.google.com/apis/library and create a credential for your application.
So go ahead and create your application in it and make sure to note down the client id and client secret from it
In the Authorized Redirect uri make sure to give a proper url in my case it is given as https://<webseal ip/hostname>/auth/google/glogin.jsp
where auth/google is my junction in ISAM as well as my context root in the application and glogin.jsp is my application landing/home page.

3. JSP Call to Google OAUTH:
You can use the below code base for your application.
https://drive.google.com/file/d/0B-uIjGbTPyCXSjhBZW81UkROLTQ/view?usp=sharing
The zip file contains the Ecclipse Code which can be made to a war file and deployed on websphere application server.
The JSP code for making the call to google will look like below.
<%@ page language="java" contentType="text/html; charset=ISO-8859-1"
pageEncoding="ISO-8859-1"
import="com.tivoli.am.fim.demo.AccessTokenRetriever"
import="com.tivoli.am.fim.demo.ResourceRetriever"%>
<html>
<head>
<meta http-equiv="Content-Type" content="text/html; charset=ISO-8859-1">
<meta http-equiv="Pragma" content="no-cache">
<title>Facebook Login</title>
<%
String appid = "987654321.apps.googleusercontent.com";
String appsecret = "123456789";
String redirectURL = "https://demowebseal.com/auth/google/glogin.jsp";
String email = null;
String code = request.getParameter("code");
String token = request.getParameter("access_token");
if (code == null) {
// initiate authorization flow
String authorizeURLStr = "https://accounts.google.com/o/oauth2/auth?client_id=" + appid
+ "&approval_prompt=force&redirect_uri=" + redirectURL
+ "&response_type=code&scope=https%3A%2F%2Fwww.googleapis.com%2Fauth%2Fuserinfo.email+https%3A%2F%2Fwww.googleapis.com%2Fauth%2Fuserinfo.profile&state=profile";
response.sendRedirect(authorizeURLStr);
} else {
String accessTokenURLStr = "https://accounts.google.com/o/oauth2/token";
AccessTokenRetriever atr = new AccessTokenRetriever();
String accessToken = atr.getAccessToken(accessTokenURLStr, code);
String resourceURLStr = "https://www.googleapis.com/oauth2/v1/userinfo?access_token=" + accessToken;
ResourceRetriever rr = new ResourceRetriever(resourceURLStr);
email = rr.getEmail(resourceURLStr);
// use the email address as a response header and redirect to the epac CGI
response.setHeader("am-eai-user-id", email);
response.setHeader("am-eai-redir-url", "https://demowebseal.com/cgi-bin/epac");
}
%>
</head>
<body>
If you see this, you haven't set the trigger URL properly in WebSEAL's
config file.
<br /> User email address is:
<%=email%>
</body>
</html>
4. Installation and Configuration of Custom googleauth/EAI application:
Download the googleauth zip file from the below url
https://drive.google.com/file/d/0B-uIjGbTPyCXSjhBZW81UkROLTQ/view?usp=sharing
The zip file contains an ecclipse project, its a sample code which uses only email as the userid or iv-user value of the ISAM.
The jsp file contains the client secret and client id modify it with your google application value and deploy the application as a war file over Websphere or any application server.
In my case i have deployed it on websphere and gave the context root as "auth/google/". Created a Unauth transparent junction for this application in webseal and added the google certificates in websphere.
Make sure you have all the certificates including intermediate certificates of accounts.google.com host for 443 port.
In ISAM provide the below values to make googleauth application as a EAI trigger url.
eai-auth = https
eai-pac-header = am-eai-pac
eai-pac-svc-header = am-eai-pac-svc
eai-user-id-header = am-eai-user-id
eai-auth-level-header = am-eai-auth-level
eai-xattrs-header = am-eai-xattrs
eai-redir-url-header = am-eai-redir-url
retain-eai-session = no
trigger = /auth/google/glogin.jsp*
With this you are done with the setup.
For testing this solution make sure you provide a link to logging in with google option in your webseal login page and provide the url as below.
https://<websealname>/auth/google/glogin.jsp
The flow of this will look like below
This should take you to google login page for credentials.
Provide your creds and it will ask for permission to access you profile details basically your email, first name, last name etc.
Google auth code will get the request back as provided by the redirect uri in the request with a code.
Fetch the code and send it back in POST request to google for getting the token which will expire in 3600 seconds.
Google auth code will get the token and pass it back to google requesting for user details.
which will sent back in json format, decode the json and get the required value and set it as the iv-user header for webseal.
References Used:
https://developers.google.com/api-client-library/java/google-api-java-client/oauth2#android
https://github.com/google/google-oauth-java-client
https://www-304.ibm.com/connections/blogs/sweeden/entry/facebook_authentication_to_webseal?lang=en_us
Do let us know in the comments if you have any troubles in implementing this solution.
Peace Out......
